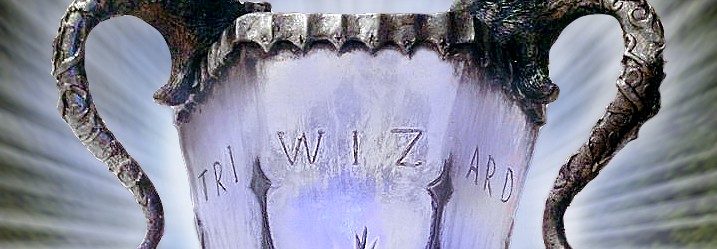

For part of my final year at uni, on a Prop Making and SFX course, I could choose what I wanted to build, which led to me making the Triwizard Cup from Harry Potter and the Goblet of Fire. Doing research into the build and seeing if anyone else out there had built a life-size replica, was near impossible. There wasn’t really a lot to go on. So if you want to make one and you are lost as I was with what direction to go in, take a look at this, or if you just like seeing how things are made, take a look…
The Base:
I started making the base first. I cut out of 1mm MDF, a series of hexagons, each getting smaller by 1mm. There are 6 hexagons included in the first half of the base, then a 2mm difference and 4 more layers each getting smaller by 1mm. (When you’re doing this step remember to number each layer, so its easy to assemble). I then made a small curve on each side of every hexagon by marking them out and sanding them back.

Next I assembled the hexagons and used wood adhesive between each layer, and clamped them together until completely set.
Then I used filler to round of the tiers. Any filler should be ok for this, I used catalyst filler, but water based polyfiller would be fine.

After that, there was a lot of sanding and wet and dry to do…
I did a primer coat, wet and dry and then primer, then Metallic silver.

I then made a silicone mould of the base, for future reproductions, just incase. this has a fiberglass jacket.

Time to do the paint effects, using Liberon Black Special Effects Wax.

I applied the wax by dabbing with a paint brush.


The Stem:
For the stem, i cut 2 hexagons, the bottom one to the appropriate size of the base and the top one, smaller but also an appropriate size and attach a ‘stem’ piece of wood, to use as an armature. Then i built up clay around it.


I let the clay dry out over night and the next day I vac formed it to use as a mould…

Then, I poured resin into the vac form mould and let it cure.

With the resin removed from the vac form, i used super sculpey to add the details and trimmings onto the edges, and using a heat gun, I heated the super sculpey for it harden.

I made a silicone mould of the stem section…

I then prepared the mould, and used clear resin to the cast the stem.

Here I added small quantities of silver glitter into the clear resin… because I like shinny things ….

Once the resin had cured and i removed it from the mould, I prepared it for painting, by masking of areas i didn’t want painted (remember mask off the top of the hexagon so that light can be shone through), and away i sprayed..

For the next part, i placed a 20(ish)cm length of 4cm PVC pipe (it was this long so that i could trim it to the right length later on), on top of the stem, and then using super sculpey, i built around it and added details, using the heat gun to harden the sculpey.

Here it is sprayed.

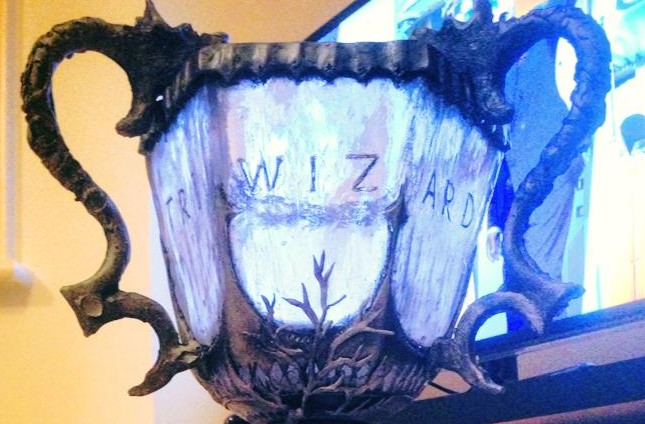
The Cup:
For the top cup section, I cut 2 circles out of MDF and in the middle of them drilled a 4cm hole in the centre of each, so I could feed the PVC pipe through. I glued these together. I then cut 6 identical sides for the hexagon cup shape and I hot glued it all together. it doesn’t have to be the strongest fix, or the neatest at this point, as I will be covering all of this and you won’t see a thing.

Next, I used water based filler and cover all gaps to round it all off.


Here, Im covering the whole thing in a layer of plasteline.

Like so…

Now I can mark out details and start to properly sculpt fine features.

Here you can just about see how the pipe feeds through…

More sculpting details… Also at this stage you can see where I have cut the shape of the top of the stem into the sculpey component, so that it all joins snug and securely.


All details done ready for the silicone mould… BUT before i did that, i plugged the hole in the top with clay.

Silicone mould done and now making a fibreglass jacket for the mould. Make a wall of clay down the centre of the mould and finer glass one side only.

Remove the clay wall, apply a release agent to the now showing fiberglass (vaseline will do) and fibreglass the other side. Don’t over lap the centre walls!

When I finished this i turned the mould the right way up and removed the plug that i put in the previously. then i poured a thin layer of silicone into the cup and spread it around.
After the fibreglass is cured, drill holes through both sides and fasten these together with bolts. (I put filler on the fibreglass jacket, because I kept getting splinters and it just makes it easier to handle. I did sand the fibreglass shards, but somehow they still managed to get in my hands, hence the filler.)

Now right way up, I poured clear resin into the gap between the silicone, (the resin tries to make the inside part of the cup mould ‘float’ so weigh it down without distorting the mould. I let it cure and i released it from the mould.

Not the neatest of moulds, but i had to work with what was at hand, but it still worked.


Released from the mould and assembled, just to get the idea of what it looks like.

Next, i masked the areas i didn’t want painted, and then sprayed it..

Painting done..

Spiral tree/ dragon:
Theres a better and more secure way of doing this, but i need cheap so I used super sculpey, and sculpted the shape around the cup and heated it to harden it. 
I somehow managed to removed the spiral from the cup to paint it and then put it back onto the cup.
I sculpted the Dragon head separate and attached them.

Handles:
The handles would be relatively simple, if it wasn’t for their awkward shape, so I made the master handle out of sculpey …

Then made a two part silicone mould to cast the handles.

2 down, 1 to go…
I bought 2 small LED lights and a battery pack and joined them together and placed them inside the stem, to shine through both ends, like so…
and there you go, thanks for reading if you made it this far :D


If you were to put this for sale how much would i be able to get it.
I would like to commission a Triwizard cup sculpture for use in my wives 6th grade classroom. If you could get back with me on a price that would be fantastic
Would you be willing to make one for me? How much would it cost? I’m not crafty and my friends wedding is coming up. They’re huge Harry Potter fans and this would kill
You did a fantastic job, excellent work! :)
If this is something you’ve decided to make for others, I’d love to hear about the options
This is amazing. I need to try to make one before Halloween. What glue(s) did you use, specifically to attach the snake handles to the cup?
Thanks! the handles are bolted on through the resin, no glue.
Hey Claire i really want to recreate this for my sister as a Christmas present, could i possibly get the dimensions for the base please :)
Hey Mike, the base is 28cm width and 5cm height.
The whole height off the cup is approx 40cm, just to let you know. :) Claire
Amazing!! You should buy them
I mean sell them
Please contact me if you would be interested in making one to sell to me directly.
I constantly spent my half an hour to read this website’s articles or reviews
daily along with a cup of coffee.
How much do you think it will took time to made one I have a party after a month and a half and I want to make it
A gift for a friend …
hi there im an aspiring model making student looking for a degree course on prop making, whereabouts did you study if you dont mind me asking?
Northbrook College, Worthing